With the release of OBS for Mac, a common question for support (aka the all-knowing community forums) is: “Why can’t I capture audio desktop audio?”
Unlike Windows, macOS does not have any system-level audio routing. This means that an individual app like SYQEL can’t access audio signal from other apps (like media players) as soon as you install it.
But! – There is a workaround.
The key to audio capture is Loopback. It passes audio from one source to another, which is exactly what we need for SYQEL to work on Mac.
So let’s get into it.
Step 1: Sign up for a SYQEL account. (If you’ve already done this, skip this part.)
On the top right side of the SYQEL website is a purple “Sign Up Now” button. Click on that (or this link) and fill out the required information (name, email, password, etc.) This account also acts as your web based music visualizer.
But a web based VJ app won’t react immediately to your audio, and it won’t work when you’re not online. This is why you have to install the desktop app if you want the best quality visuals wherever you go.
Step 2: Install the SYQEL Desktop app. (Again, if you’ve already done this, Step 3 is for you.)
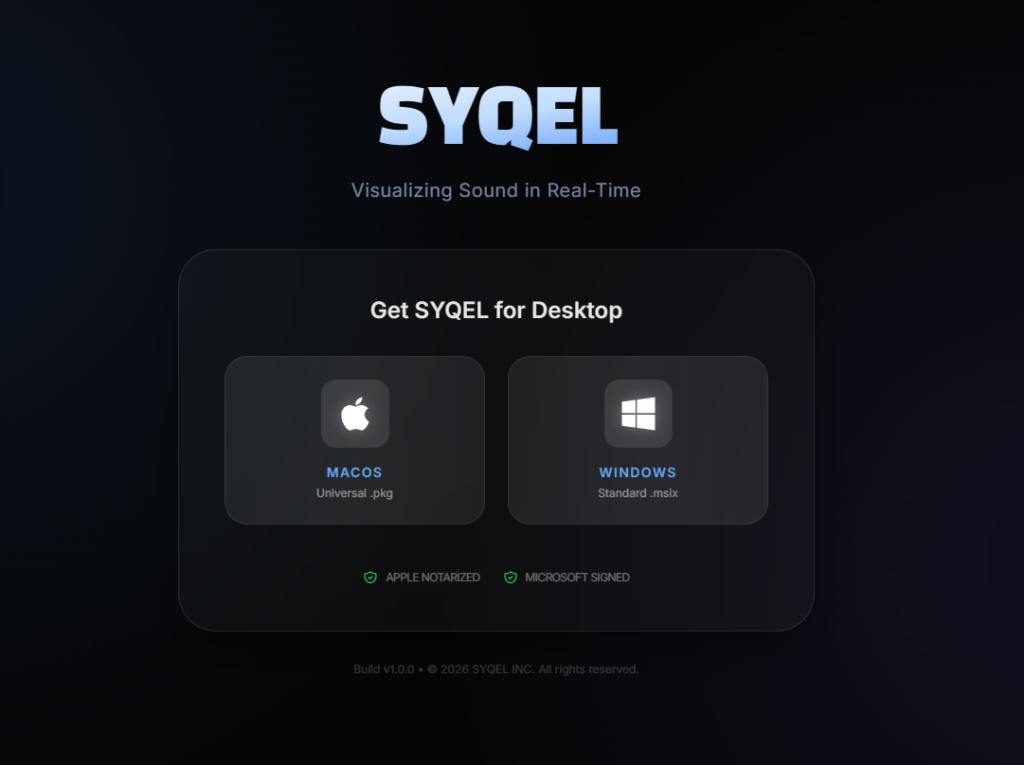
First, click on Download in the header menu on the SYQEL homepage, or just click this link.
Then run the .pkg file to install it to the Applications, then run the app.
Step 3: Download Loopback, the audio pass app built specifically for Macs to pass audio between different apps.
SYQEL uses microphone input or desktop audio as sources for audio input. However, SYQEL can’t access your desktop audio by itself. You need a way for your macOS to “talk to” your desktop media apps and get the audio input needed for SYQEL to immediately react to your music in real time.
This is where Loopback comes in. Loopback is a virtual “wire interface” app made to connect different audio inputs and outputs. It’s useful for many applications, and it’s exactly what you need for SYQEL to receive your audio.
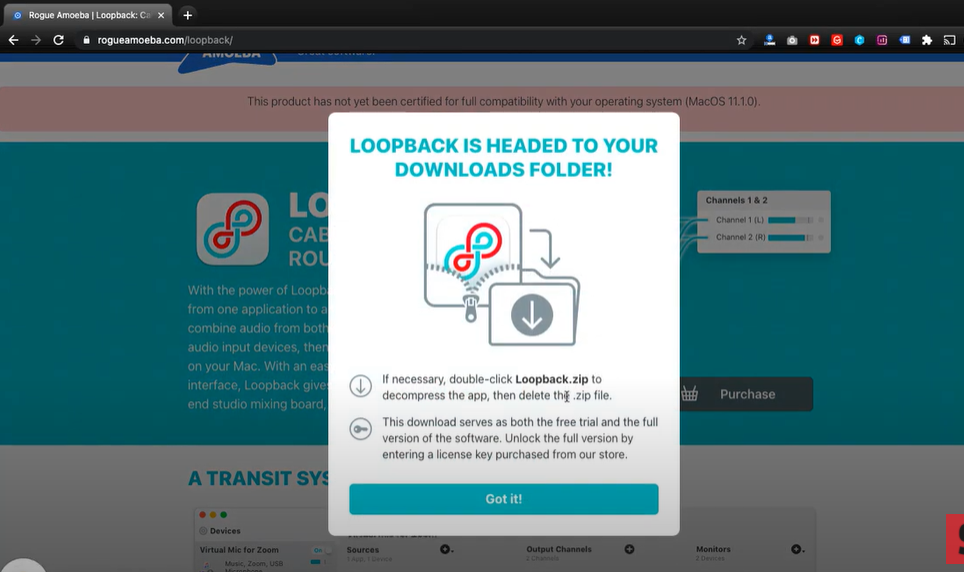
First, go to the Loopback homepage. You can search up “Loopback” or just click this link. Click the “Free Download” option.
This will download a .zip file to your Downloads folder. It will help if you move the .zip file to your desktop homepage (by creating a desktop shortcut). You don’t have to do this, but doing so will make it easier to see and use.
Step 4: Launch the Loopback app on your desktop.
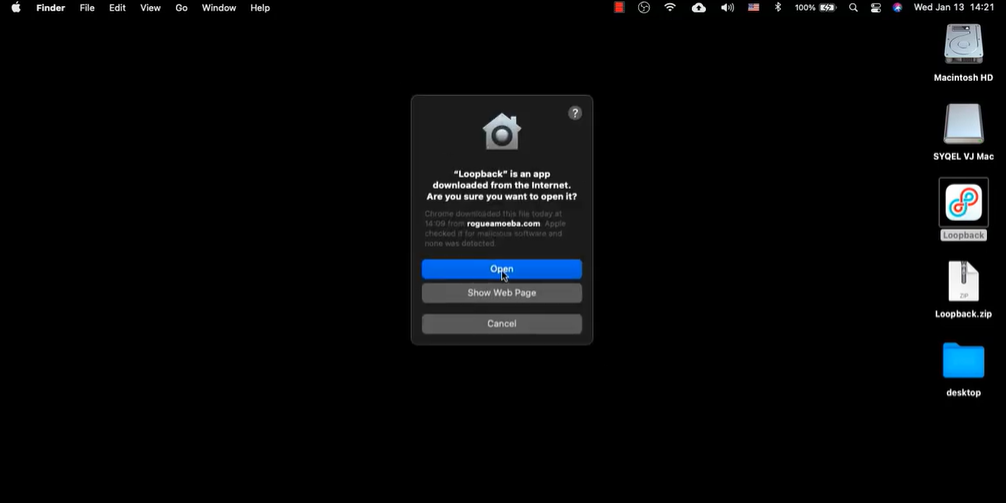
Click on the .zip file on desktop. Doing this will expand the file.
When you expand it, the Loopback icon (as seen above) will appear on your desktop. Click on the icon, and a pop-up will appear asking you if you’re sure you want to open the app. Click “Open.”
Step 5: Connect your audio source to your monitor output (SYQEL) within the Loopback interface.
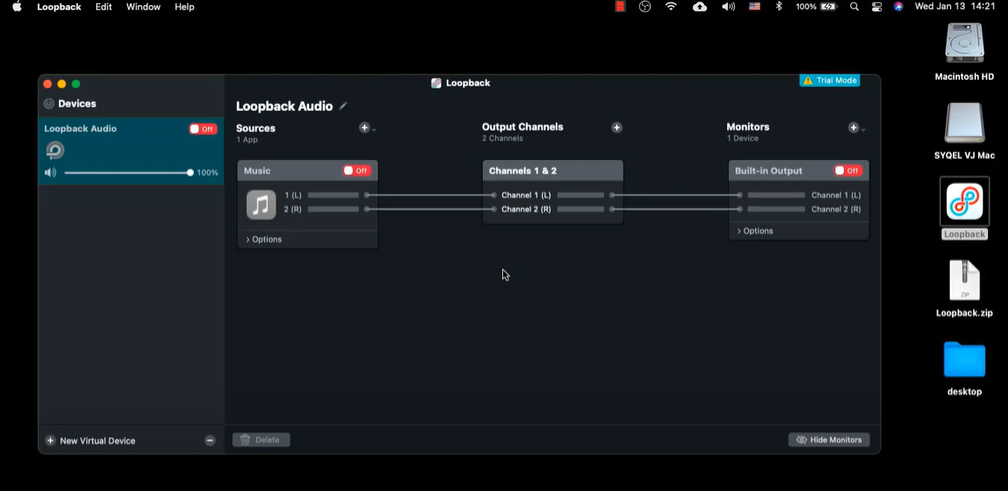
Loopback creates a virtual wire-based interface, resulting in a high-end audio mixing board within your computer. This “mixing board” will funnel your music into SYQEL.
To do this, toggle the Loopback Audio button (under the “Devices” menu on the left side of the screen) from “Off” to “On.”
Do this for your “Sources” and “Monitors” settings as well.
Now SYQEL and your desktop audio source are ready to be connected.
Now SYQEL and your desktop audio are connected.
Step 6: Choose Loopback as the audio source for SYQEL to visualize.
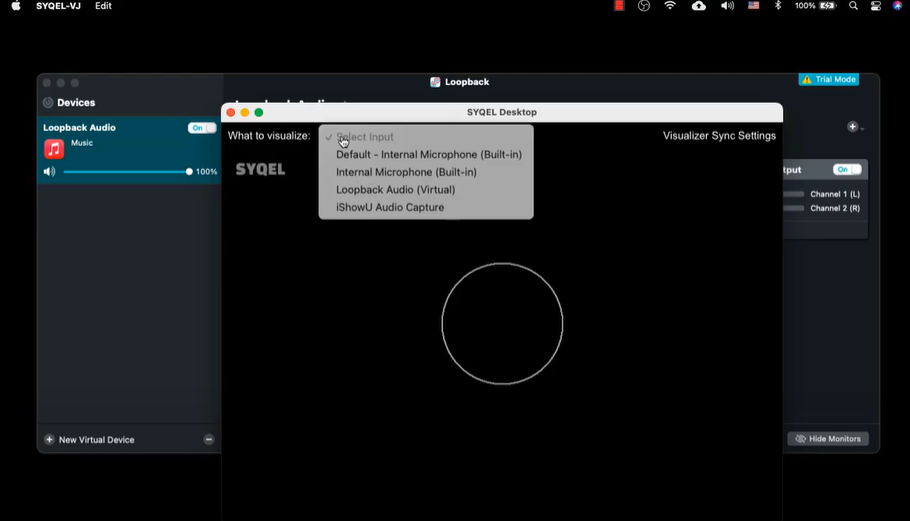
Now, relaunch the SYQEL app on your desktop. On the top of the app screen, you will see “What to Visualize:” From all the sources, choose “Loopback Audio (Virtual).”
Now, SYQEL is officially reacting to the audio playing on your desktop. (Be proud. But not finished.)
Step 7: Add SYQEL as a Window Capture source in OBS. (If you know how scenes and sources work, just choose SYQEL desktop as your window source and move past this OBS breakdown.)
If you are reading this tutorial, I am assuming that you already have an OBS account and some sense of how to use it. If not: Download OBS and read this quickstart guide.
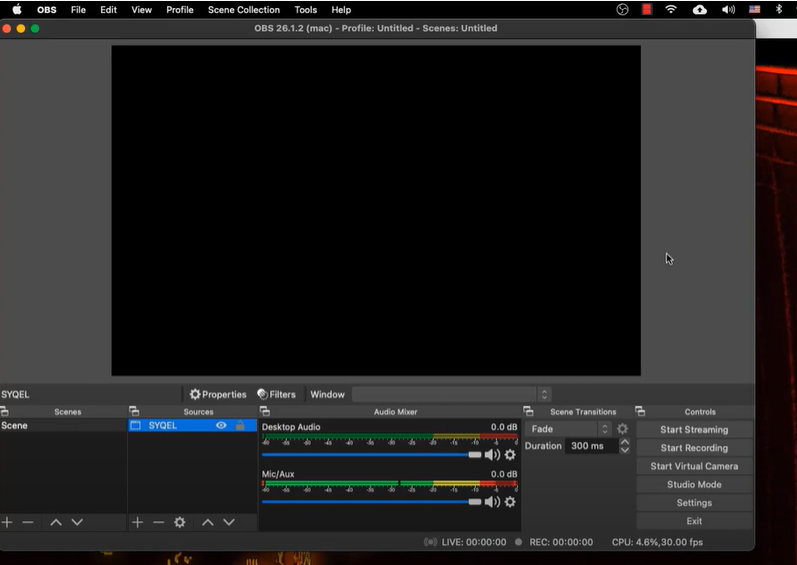
Okay, welcome back to those who just joined the OBS crew. Launch OBS on your desktop.
OBS works using scenes and sources. The scenes are the audio and visual broadcast together (much like a “scene” in the conventional sense). The sources are where the scene’s audio and visuals come from.
If you want to use SYQEL as a visual source, you will first need to add a scene to contain it.
Step 7.1: Add a scene to contain your visual source (SYQEL).
Right-click on the box under Scenes (or use the plus at the bottom) to add a scene if there are none listed yet. Name it something you will remember.
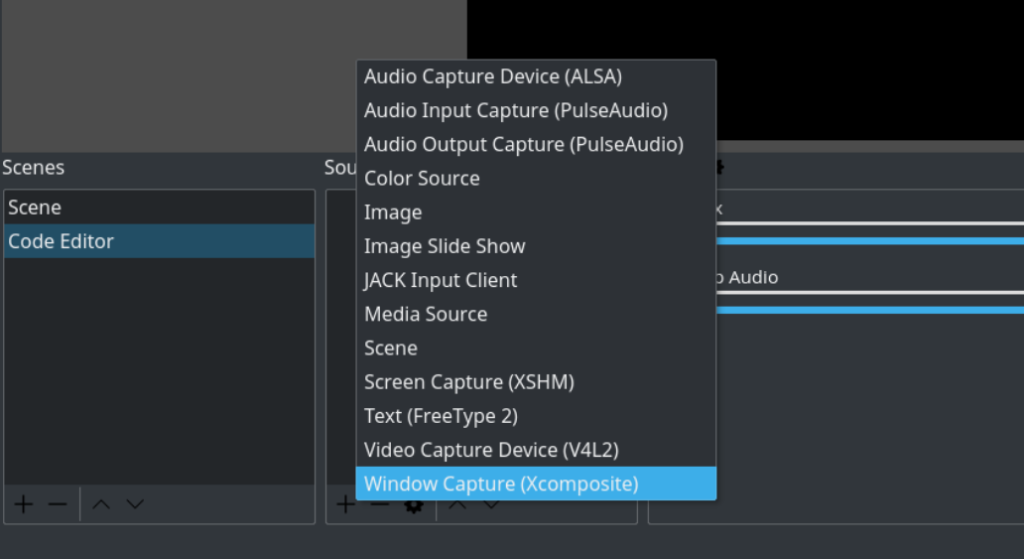
Once you have created a Scene, right-click in the Sources box (or use the plus at the bottom) to add a source. Click “Window Capture.” Name this source “SYQEL.”
With the Window Capture source, you must choose which window OBS will use for the visual output of your broadcast. Whichever window you choose will show up as the streaming visual.
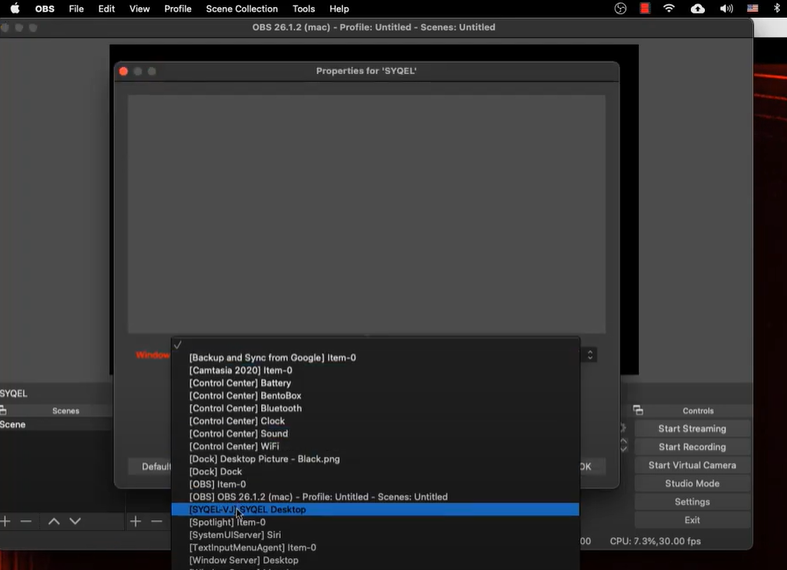
Step 7.2: Choose the SYQEL app as your window capture source.
To choose the SYQEL app as your window capture source, click on it from the “Sources” list. Then a “Properties” pop-up will show up on your screen.

Click on the empty box next to the red “Window” text. Find and choose “SYQEL Desktop” as your window source, then click “Okay”.
Step 7.3: Fit SYQEL as the whole screen on OBS.
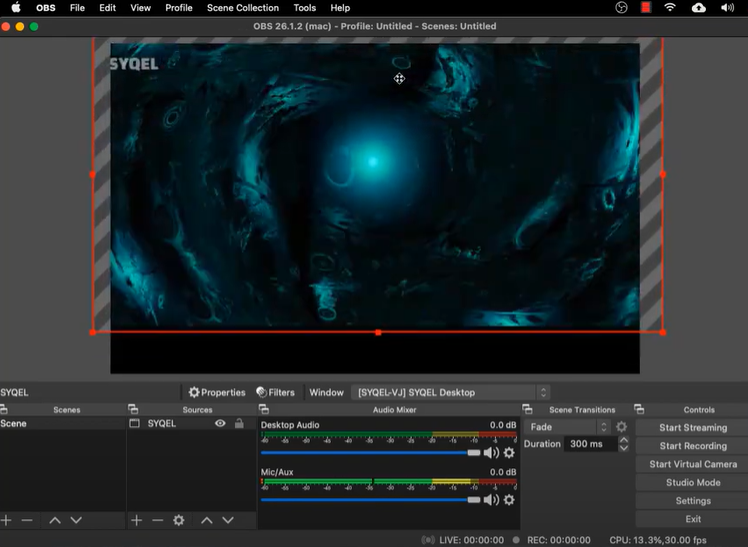
The SYQEL app window also includes the SYQEL desktop bar and the visualizer settings on the top. Your audience doesn’t want to see that.
Change the size and position of the window source using the red dragging tool. Expand the window so that you can’t see the top of the app’s window and voila! – SYQEL is now the visual streaming source for your shows.
Note: You may have to go back into your SYQEL desktop application and choose “Loopback Audio” as your audio input source.
Basically, repeat Step 6 to make sure SYQEL is still using Loopback as the audio source.
And there you have it – you now know how to use Loopback to connect audio in different apps on Mac, and how to use SYQEL as your visual window source when you stream.
Stream away, Mac users.